Blizzard Ski Helmet with Drone
Model: "Blizzard" Ski Helmet with Drone
Material:
ProtoFab Formula W Resin
Production technique: SLA 3D printing
Lead time: 3 days
Client requirement: Lines must protrude, paint must be applied evenly, color contrast must be crisp, overall appearance must be stylish and attractive
Project Background
We were contacted by the organizing committee of the 2017 Cross-Strait Industrial Design Awards with a request to provide professional prototype production for each of the competitors. With high-quality models available for each of the products taking part, it would be much easier for competitors to show off their innovation and ingenious design. The creators of the helmet got in touch with us and sent their drawings, requesting bold and sweeping lines and finishing as close to perfect as possible. (Drawings on the right)
Design Philosophy
Blizzard is aimed primarily at skiing and snowboard enthusiasts. As extreme sports, skiing and snowboarding are both fairly dangerous and serious injuries often occur. Therefore, having good equipment that can improve safety is essential. Blizzard contains a chip that allows for GPS tracking. This could be critical in the event of a fall, becoming lost, or an avalanche, as the wearer could be found much more quickly than normal. In the freezing conditions that skiers often face, this is essential. In addition, Blizzard has a built in high-speed camera that can record spectacular moments with incredible clarity and detail. However, the most unique aspect of Blizzard is its drone support. A recording drone is stored inside the helmet and can take off and land there at any time.
Project Analysis
On receiving the drawings from the client, the first thing for the ProtoFab team to decide was whether to go with CNC machining or 3D printing. It was decided quickly that 3D printing was clearly the best solution. Traditional CNC requires a full design breakdown, programming, NC, and other complex and time-consuming tasks. This ordinarily leads to high costs. On the other hand, 3D printing is a much simpler process giving much shorter lead times. For a project such as this one where the helmet doesn't need to be able to support a huge amount of weight, 3D printing is particularly well-suited.
Challenges
For this project the finishing was crucial. The polishing and painting had to be just right to achieve the look the client requested. The design has a number of protruding areas and is made up of four colors - matte black, glossy black, glossy orange, and metallic grey. This presents challenges for our experienced team with regards polishing and achieving a perfect contrast between the different colors.
Solutions
Because this model could be printed directly as a single piece, all that was required was for our technical specialists to run the drawings through software and add all the necessary support structures. These keep the model stable during printing and prevent any potential collapses, and also mean it is possible to print the entire model in one go, rather than having to split it up into sections.
Complex Finishing
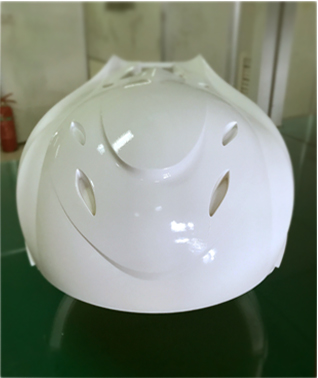
Once printing was complete, we carefully removed the model and washed it with alcohol. This was to remove any liquid material that might have been left behind during printing. Next, we had to remove the supports. This has to be done very carefully so as not to leave any markings on the final model. Below is the model with all the supports removed.
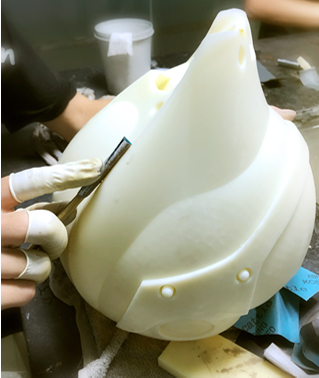
Printed models are usually a little rough to begin with, with some marks and ridges visible. We begin sanding with coarse sandpaper (around 400) and gradually progress to extremely fine sandpaper (around 1500). This project was particularly challenging with regards to polishing given the complexity of the surfaces on the top of the helmet. Painting also required an unusual level of care, and in order to make sure the paint was applied perfectly evenly we had three separate rounds of polishing and painting,


Applying the Top Coat
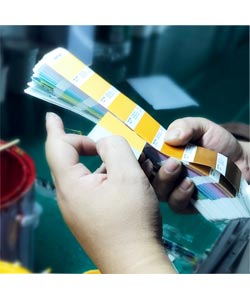
Getting the color of the paint just right is critical for achieving the look the client requested. Our team had to use all of their experience to ensure a perfect color division and a completely even shade. The image below shows our technician comparing the paint with the color card provided by the client.


Achieving the right color requires patience and great care. It is imperative that final color matches the client's requirement exactly.
Applying Varnising
According to the client's requirements we then applied varnish to give the helmet a glossy finish.
Final Polishing
After the varnish had dried, all that was left was for a final round of polishing to achieve as eye-catching a look as possible.
Assembly

Finished Model
This project lasted for 3 days, and we were personally very happy with how it turned out. After delivery the client was also very pleased, particularly with the colors and the quality of the finishing. If you'd like to learn more about the 3D printing solutions offered by ProtoFab and how they can be applied to different industries, or you have a project similar to the one described here, don't hesitate to get in touch!


